Videos to help :
Differences
Okay so all of these videos show there interpretations of how these boards are made they look simple but are all pretty hard to produce the main real differences between these videos and the way they produce there boards is only the scale of production the first video shows single production, the second is mass production they produce millions of boards and show how the process can change and the last shows batch production of how a small back yard business can create something so unique.
Websites on the process :
http://en.wikipedia.org/wiki/Skateboard
http://www.madehow.com/Volume-6/Skateboard.html
http://skateboarding.transworld.net/1000012158/news/skateboard-science/
http://tjorr.iweb.bsu.edu/ITDPT303/page2/page2.html
http://www.articletrader.com/sports/extreme/the-manufacturing-process-of-a-skateboard.html http://www.instructables.com/id/Use-a-Vacuum-cleaner-to-build-your-own-Skateboard/?ALLSTEPS - probably the best to use !!!
Information on the process :
A). So obviously you start with the veneer you place each veneer into an order which makes it easier down the process here it is :
1. Face
2. Core layer
3. Cross band
4. Core layer
5. Cross band
6. Core layer
7. Face
B). You then have to glue each layer together it is always recommended to use a roller for this, you have to work fast to glue them together without it drying and then having to restart the production and wasting material.
C). The veneer is then placed into a skateboard mold which with the help of a press, will force the veneer into the desired shape. There are a variety of these which are foam, wood, aluminum and concrete.
D).Regardless of the mold you use, you will want to cold press your veneer .Many factors go into how much pressure you'll need but 175 psi or 25 tons is a good place to start. Which is why a 5 ton press requires the veneer to be pressed for a longer period of time.The formula you use to determine the proper tonnage is as follows. Take your total number of sq. inches, a sheet of 9.5" by 34" veneer is 323 (9.5 times 34). Multiply that number by your psi (175), which equals 56,525. Divide this number by 2000 (pounds in a ton) to arrive at about 28 tons.With the proper tonnage, some glues can set up as quickly as 10 minutes or less. If you are using an actual skateboard glue such as Multibond Sk8 or PC-2365 and correct tonnage, you can remove your decks within 2 hours (be sure to check with the manufacture of the glue to make sure).If you are using less than the required tonnage, say a 5 ton press, you would just leave your veneer in the skateboard press for a longer period of time. I recommend a full 24 hours.Once your skateboard deck has been removed from the mold, let it cure for an additional 24 hours before you do any more work on it. This allows both the glue and wood to completely dry.
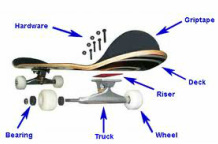
E). You want to drill your holes for the truck mounting hardware with a drill press. You can also use a standard drill, but you must make the holes as perpendicular to the deck as possible.To locate the holes, you can use an old deck for a template or you can measure to find your true center of your deck, determine your wheelbase, then go from there.The truck holes are 1 5/8" apart and 2 1/8" from front to back. Use a 3/16" drill bit to drill the holes.
F). Shaping the deck is often accomplished by using another deck as a template. Trace the deck onto your uncut blank so you can see where to cut.Use a band saw or jig saw to cut out the deck.
G). The way a skateboard deck gets it's edge's are rounded this can be achieved by using a router or a lot of sanding. You can use a palm router or "mini" router as it is less cumbersome and easier to maneuver around the deck.The amount of radius is determined by personal preference. Once you've gotten the edges taken care of, you'll want to sand your skateboard deck. It is helpful but not necessary to use an orbital sander.
H). Once the deck has been sanded smooth, use a cloth to remove the saw dust left behind. A cloth is essentially a cloth coated in a particular kind of wax. It works well and is highly suggest to use one.Now that your deck is smooth and clear of debris, you're ready to seal it.
I).After you've applied the sealer, you can move on to the graphics. Stencil, spray paint, free hand or screen print... it's up to you. Just make sure that you use a paint with the same base as your sealer and final coat. What is meant by this is, if your sealer is water based, use a water based paint. If your sealer is solvent based, use a solvent based paint kind of common sense.
J). Once you have finished your graphics and you've left them to dry overnight, take your cloth and wipe down the deck. Using a clear coat of sealer cover the deck and let it dry. Depending on the product, you may want to give your skateboard several coats of finish but it is up to you.
So there you go how to make a skateboard from scratch it is an expensive production but once completed you can then say you have produced your very own skateboard.
1. Face
2. Core layer
3. Cross band
4. Core layer
5. Cross band
6. Core layer
7. Face
B). You then have to glue each layer together it is always recommended to use a roller for this, you have to work fast to glue them together without it drying and then having to restart the production and wasting material.
C). The veneer is then placed into a skateboard mold which with the help of a press, will force the veneer into the desired shape. There are a variety of these which are foam, wood, aluminum and concrete.
D).Regardless of the mold you use, you will want to cold press your veneer .Many factors go into how much pressure you'll need but 175 psi or 25 tons is a good place to start. Which is why a 5 ton press requires the veneer to be pressed for a longer period of time.The formula you use to determine the proper tonnage is as follows. Take your total number of sq. inches, a sheet of 9.5" by 34" veneer is 323 (9.5 times 34). Multiply that number by your psi (175), which equals 56,525. Divide this number by 2000 (pounds in a ton) to arrive at about 28 tons.With the proper tonnage, some glues can set up as quickly as 10 minutes or less. If you are using an actual skateboard glue such as Multibond Sk8 or PC-2365 and correct tonnage, you can remove your decks within 2 hours (be sure to check with the manufacture of the glue to make sure).If you are using less than the required tonnage, say a 5 ton press, you would just leave your veneer in the skateboard press for a longer period of time. I recommend a full 24 hours.Once your skateboard deck has been removed from the mold, let it cure for an additional 24 hours before you do any more work on it. This allows both the glue and wood to completely dry.
E). You want to drill your holes for the truck mounting hardware with a drill press. You can also use a standard drill, but you must make the holes as perpendicular to the deck as possible.To locate the holes, you can use an old deck for a template or you can measure to find your true center of your deck, determine your wheelbase, then go from there.The truck holes are 1 5/8" apart and 2 1/8" from front to back. Use a 3/16" drill bit to drill the holes.
F). Shaping the deck is often accomplished by using another deck as a template. Trace the deck onto your uncut blank so you can see where to cut.Use a band saw or jig saw to cut out the deck.
G). The way a skateboard deck gets it's edge's are rounded this can be achieved by using a router or a lot of sanding. You can use a palm router or "mini" router as it is less cumbersome and easier to maneuver around the deck.The amount of radius is determined by personal preference. Once you've gotten the edges taken care of, you'll want to sand your skateboard deck. It is helpful but not necessary to use an orbital sander.
H). Once the deck has been sanded smooth, use a cloth to remove the saw dust left behind. A cloth is essentially a cloth coated in a particular kind of wax. It works well and is highly suggest to use one.Now that your deck is smooth and clear of debris, you're ready to seal it.
I).After you've applied the sealer, you can move on to the graphics. Stencil, spray paint, free hand or screen print... it's up to you. Just make sure that you use a paint with the same base as your sealer and final coat. What is meant by this is, if your sealer is water based, use a water based paint. If your sealer is solvent based, use a solvent based paint kind of common sense.
J). Once you have finished your graphics and you've left them to dry overnight, take your cloth and wipe down the deck. Using a clear coat of sealer cover the deck and let it dry. Depending on the product, you may want to give your skateboard several coats of finish but it is up to you.
So there you go how to make a skateboard from scratch it is an expensive production but once completed you can then say you have produced your very own skateboard.
Advantages and Disadvantages of the normal production process.
First thing we have to look at is the cost of all of this of course it isn't a cheap product to produce app it costs £70 - £80 for all the materials, production and work force to produce a board the main things you must look at when making them is the work force and how many people it can sometimes take to produce a board.To produce a high quality board you must look at the experience of a work force, the machinery being used and how the board will be used, if a board is going to be used for professional competitions it will cost more and be of higher quality than a board that is going to be used for a teenage skater , this is why when producing a board at each part there is quality controls to make sure that each area of the board is at a high standard and there is no areas that could cause danger to the rider or anyone else. Each board is identical in the way they are produced but each have individual designs. Differences between small and large companies is mainly the machinery used to produce the product.
